> ## Documentation Index
> Fetch the complete documentation index at: https://docs.oleria.ai/llms.txt
> Use this file to discover all available pages before exploring further.
# Okta
Oleria provides identity security and access management teams with visibility and intelligence into who has access to what; where did they get that access; how are they using it; and, should they even have it. As part of that promise, we deep integrate your Okta instance into the Oleria platform. This document provides step-by-step guidance for integrating Okta with your Oleria workspace.
## Prerequisites
* The user granting these permissions must have super admin privileges
Standard integrations are configured with read-only permissions. Super admin permissions are limited to the API scopes specified in the steps below. Use a service account (and not an employee account) with the suggested privileges for the integration to ensure continuity.
## Create an Oleria Application in Okta
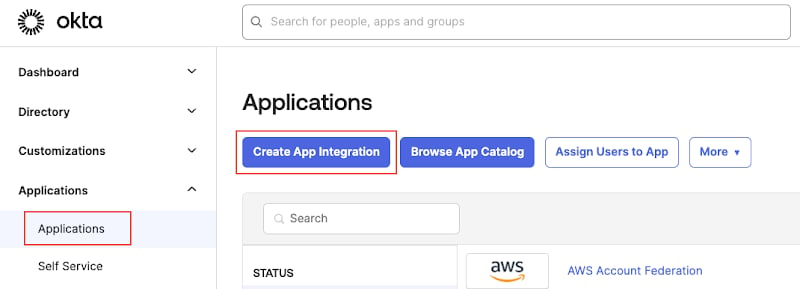
Login to the Okta admin console, navigate to **Applications**, and select **Create App Integration**.
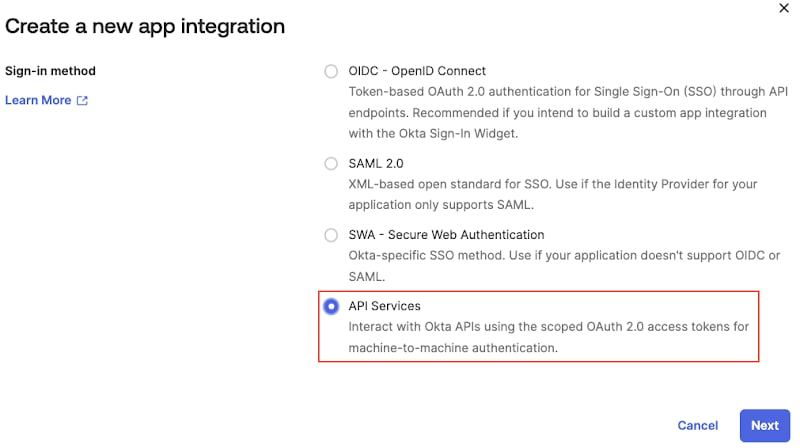
 Select **API Services** and select **Next**.
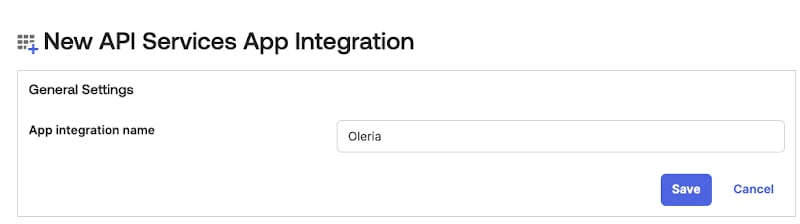
 Give the App Integration Name as "Oleria" and select **Save**.
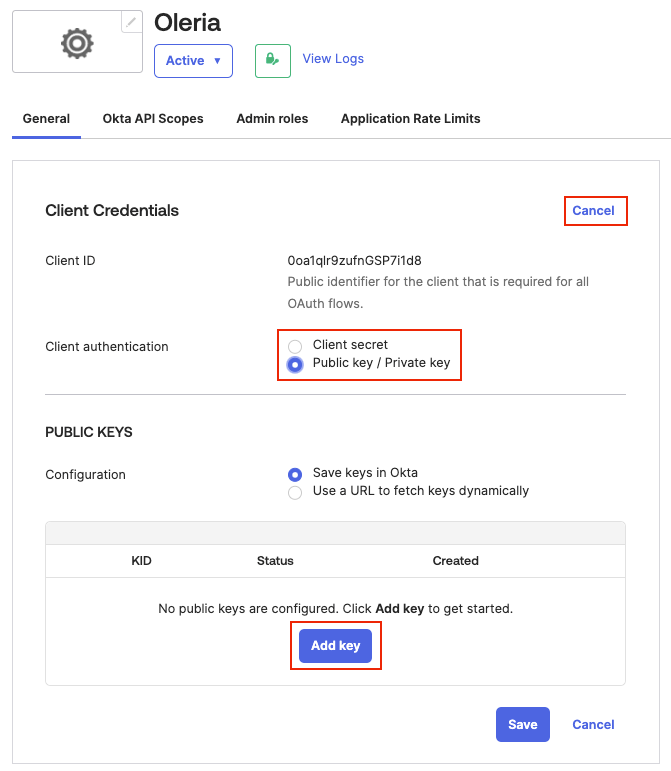
 In the Oleria app, go to **General** → **Client Credentials** → select **Edit**.
* Set **Client authentication** to **Public key / Private key**
* Select **Add Key** to generate a key
* Save the **Client ID** - you will need it when connecting in Oleria
Make sure there is only one key active for this application. The integration will not pull data if there are multiple active keys.
In the Oleria app, go to **General** → **Client Credentials** → select **Edit**.
* Set **Client authentication** to **Public key / Private key**
* Select **Add Key** to generate a key
* Save the **Client ID** - you will need it when connecting in Oleria
Make sure there is only one key active for this application. The integration will not pull data if there are multiple active keys.
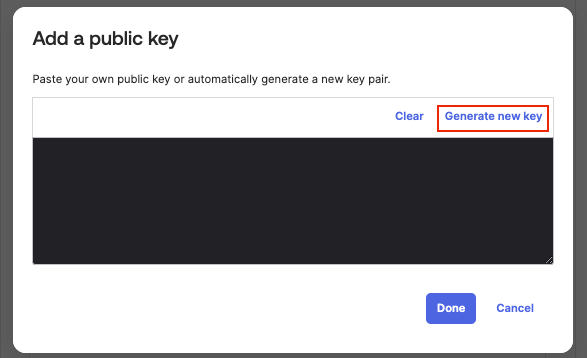
 Add a public key by selecting **Generate new key**.
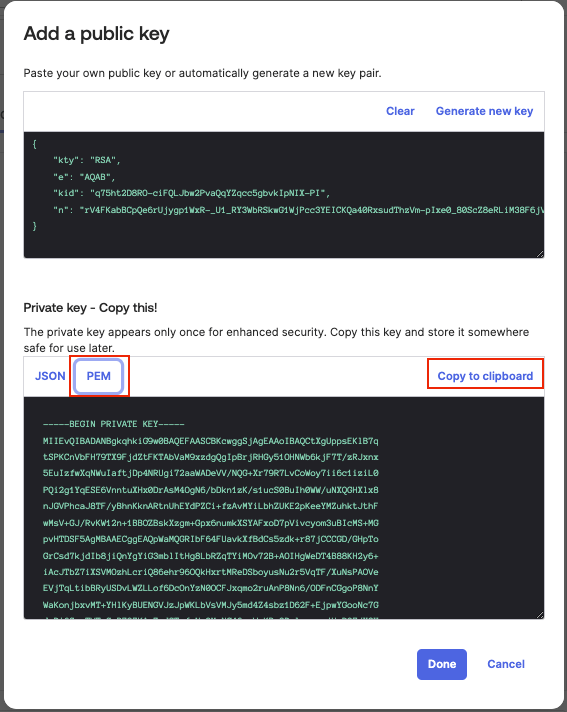
 Save the key in **PEM** format and select **Copy to clipboard**. You will need this private key when connecting in Oleria.
After saving, copy the key's **Key ID** from the Public Keys table - you will need it as the **Private Key Id** when connecting in Oleria.
You will need to generate a new key if you forget to copy or lose the key.
Save the key in **PEM** format and select **Copy to clipboard**. You will need this private key when connecting in Oleria.
After saving, copy the key's **Key ID** from the Public Keys table - you will need it as the **Private Key Id** when connecting in Oleria.
You will need to generate a new key if you forget to copy or lose the key.
 Go to **Okta API Scopes** and grant the following permissions:
```
okta.apps.read
okta.appGrants.read
okta.factors.read
okta.groups.read
okta.logs.read
okta.roles.read
okta.userTypes.read
okta.users.read
okta.policies.read
okta.features.read
okta.authenticators.read
okta.apiTokens.read
okta.agentPools.read
okta.oauthIntegrations.read
```
To perform remediations, grant the following additional permissions:
To disable dormant accounts:
```
okta.users.manage
```
To remove dormant accounts from groups:
```
okta.groups.manage
```
To validate that the Oleria app has been granted group management permission:
```
okta.appGrants.read
```
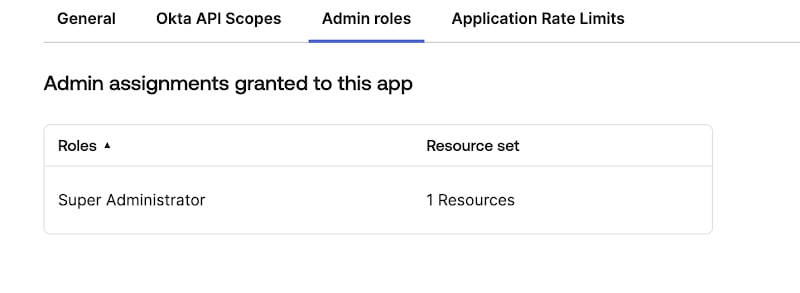
Go to **Admin roles**, select **Edit assignments**, and add the **Super Administrator** role.
Narrower roles don't cover everything this integration reads: a **Read-only Administrator** role lacks access to administrator metadata (see the note below), and a custom role scoped to the same resource set still couldn't retrieve activity log data. Super Administrator is the only built-in role confirmed to return both.
Okta requires both the role and the API scopes together, though - the role alone grants the app no capability. With the Super Administrator role and only the read-only scopes from Step 7, the Oleria app can read your Okta data but cannot write, remediate, or administer anything. Write access is limited to exactly the remediation scopes you granted in Step 8, if you chose to enable them. The role only raises the ceiling of what's possible - the scopes you grant are what Oleria can actually do.
Read-only Administrators can't view administrators or their role assignments in Okta - that permission belongs to Super Administrator alone, so a read-only connection can't retrieve user role assignments via the API.
Go to **Okta API Scopes** and grant the following permissions:
```
okta.apps.read
okta.appGrants.read
okta.factors.read
okta.groups.read
okta.logs.read
okta.roles.read
okta.userTypes.read
okta.users.read
okta.policies.read
okta.features.read
okta.authenticators.read
okta.apiTokens.read
okta.agentPools.read
okta.oauthIntegrations.read
```
To perform remediations, grant the following additional permissions:
To disable dormant accounts:
```
okta.users.manage
```
To remove dormant accounts from groups:
```
okta.groups.manage
```
To validate that the Oleria app has been granted group management permission:
```
okta.appGrants.read
```
Go to **Admin roles**, select **Edit assignments**, and add the **Super Administrator** role.
Narrower roles don't cover everything this integration reads: a **Read-only Administrator** role lacks access to administrator metadata (see the note below), and a custom role scoped to the same resource set still couldn't retrieve activity log data. Super Administrator is the only built-in role confirmed to return both.
Okta requires both the role and the API scopes together, though - the role alone grants the app no capability. With the Super Administrator role and only the read-only scopes from Step 7, the Oleria app can read your Okta data but cannot write, remediate, or administer anything. Write access is limited to exactly the remediation scopes you granted in Step 8, if you chose to enable them. The role only raises the ceiling of what's possible - the scopes you grant are what Oleria can actually do.
Read-only Administrators can't view administrators or their role assignments in Okta - that permission belongs to Super Administrator alone, so a read-only connection can't retrieve user role assignments via the API.
 ## Connect Okta to Oleria
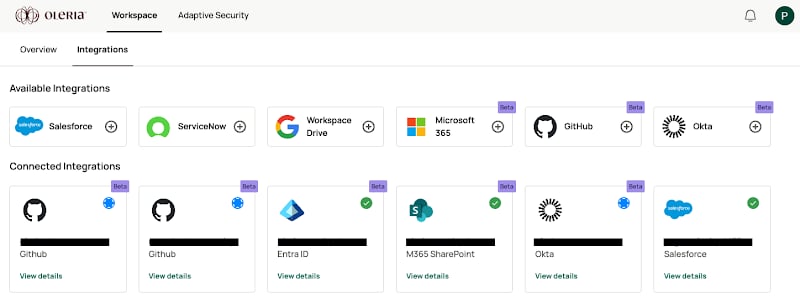
Go to your Oleria workspace, select **Integrations** → select **Okta**.
## Connect Okta to Oleria
Go to your Oleria workspace, select **Integrations** → select **Okta**.
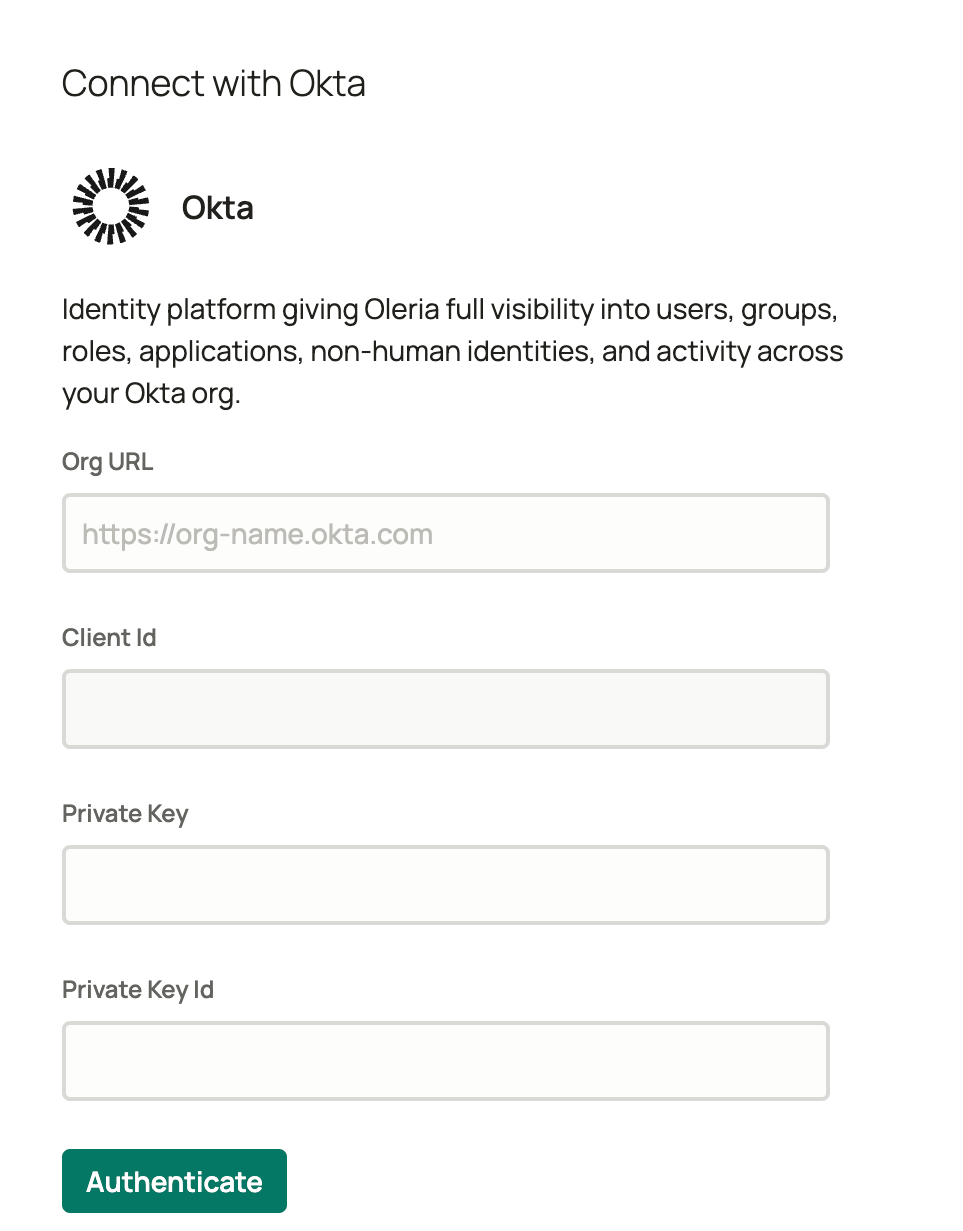
 Select **Continue** and provide the following:
* **Org URL** - your Okta URL, for example `https://yourcompany.okta.com` (or your custom Okta domain, if you've configured one). Don't use the Okta admin URL - it includes `-admin` before `.okta.com` (for example `https://yourcompany-admin.okta.com`) and won't work here.
* **Client ID** - copied from the app configuration above
* **Private Key** - copied from the app configuration above
* **Private Key Id** - the key's **Key ID**, copied from the Public Keys table in Step 6
Select **Continue** and provide the following:
* **Org URL** - your Okta URL, for example `https://yourcompany.okta.com` (or your custom Okta domain, if you've configured one). Don't use the Okta admin URL - it includes `-admin` before `.okta.com` (for example `https://yourcompany-admin.okta.com`) and won't work here.
* **Client ID** - copied from the app configuration above
* **Private Key** - copied from the app configuration above
* **Private Key Id** - the key's **Key ID**, copied from the Public Keys table in Step 6
 Find the newly integrated Okta instance in your Oleria workspace connected integrations.
 ## Contact us
For questions about this integration, contact us at [support@oleria.com](mailto:support@oleria.com).
## Contact us
For questions about this integration, contact us at [support@oleria.com](mailto:support@oleria.com).