

This page is about signing in to Oleria and provisioning Oleria accounts from Okta. It is not the same as the Okta integration under Integrations, which connects Okta as a data source so Oleria can analyze your Okta tenant’s identities and access. That integration does not affect who can sign in to Oleria or how.
Overview
Main Workspace vs. Governance App
Oleria has two independent surfaces, each with its own sign-in and provisioning configuration:- Main Workspace - where administrators, operators, and analysts run Oleria itself: posture, access graph, workflows, and settings.
- Governance App - a separate portal where reviewers and approvers complete access reviews, act on access requests, and work governance queues. Governance app users are a distinct population from workspace users, typically much larger (anyone in the org who might approve or review something), and usually don’t need any other access to Oleria.
SSO vs. SCIM vs. automatic user provisioning
Oleria has three related but independent mechanisms. SSO is for authentication only, where as SCIM and automatic user provisioning are for provisioning.
See Automatically provision reviewers for the full detail on that setting - Part 2 of this page is about SCIM, not automatic user provisioning.
Possible provisioning flows
Because these mechanisms are independent, and each applies per workspace, several combinations are all valid. Pick the one that matches what you’re trying to achieve before you start:
This page sets up the recommended SSO + SCIM flow, one workspace at a time. If you’d rather use automatic user provisioning instead of SCIM for the Governance App, see the note at the end of Part 2.
Prerequisites
- Administrator access to your Oleria workspace
- Okta super admin access - Okta’s own guidance for enabling SCIM on a custom app is to sign in as a super admin, and lesser admin roles may not see the setting.
- Decide which workspaces - Main Workspace, Governance App, or both - you’re connecting Okta to, and whether you want SSO, SCIM, or both for each. See Possible provisioning flows above.
- For SCIM only: your Okta org must have Okta Lifecycle Management (LCM) entitlements. LCM is a separate Okta product from SSO, and without it the Provisioning setting never appears on the app. Check this before you start - it’s the most common reason this setup can’t be completed. See Okta Lifecycle Management is required for SCIM below. SSO (Part 1) does not require LCM.
- For SCIM into the Main Workspace: know which Oleria roles (
admin,operator,analyst,governance-operator,identity-lifecycle-operator) your Okta groups should map to. See How Oleria maps roles and groups.
Part 1: Set up SSO
1
Open Oleria's SSO configuration page
In Oleria, go to Settings → SSO Configuration, select the Main Workspace or Governance App tab depending on which application you’re connecting first, and click Add IdP in the SAML IdP card.
2
Create the Okta app
In the Okta Admin Console, go to Applications → Applications → Create App Integration, select Classic experience since Integration Wizard is not supported at this time. Select SAML 2.0, and name it something that identifies which Oleria workspace it’s for (for example 
Oleria - Main Workspace or Oleria - Governance App) - this matters once you’ve done this twice for both workspaces.3
Copy Oleria's SP details into Okta
On Oleria’s Oleria details step, copy the Entity ID and ACS URL. On Okta’s Configure SAML step, enter them as the Audience URI (SP Entity ID) and Single sign-on URL. Copy or download the Request signing certificate shown on Oleria’s Oleria details step - you’ll need it later in this Part if you turn on Sign requests.
4
Configure the NameID
Still on Configure SAML, set Name ID format to Persistent and Application username to Email - Oleria’s service provider requires a persistent NameID policy and rejects sign-in otherwise.
5
Add the required attribute statements
This step is on a different page than the previous one for most Okta orgs today. On Okta Identity Engine (OIE) orgs - the default for new orgs - Attribute Statements aren’t part of the Configure SAML page at all; add them afterward on the app’s Sign On tab, under Attribute Statements. Only on legacy Okta Classic Engine orgs do they appear further down the same Configure SAML page.
email, Name format Unspecified, Value user.profile.email, and a second Name name, Name format Unspecified, Value user.profile.firstName + " " + user.profile.lastName.
6
Assign users
Assign the app to the users or groups who should be able to sign in to Oleria.
7
Enter the SAML IdP details in Oleria
On the Sign On tab copy the Identity Provider metadata URL.
Back in Oleria, complete the SAML IdP details step: give the provider a Name, paste the Okta metadata URL into Metadata, and decide whether to turn on Sign requests and/or Encrypt SAML responses. Click Add identity provider.
8
If you turned on Sign requests: upload the request signing certificate to Okta
Skip this step if you left Sign requests off. Otherwise, go back to the Okta app’s General tab, open SAML Settings → Edit, and click Show Advanced Settings. Upload Oleria’s Request signing certificate (downloaded in pem format earlier in this Part) next to Signature Certificate, then set Signed Requests to Validate SAML requests with signature certificates.
9
If you turned on Encrypt SAML responses: download and upload the response encryption certificate
Skip this step if you left Encrypt SAML responses off. Otherwise, back in Oleria you’ll see a prompt to download the Response encryption certificate generated specifically for this provider - download it in pem format. In Okta, in that same Show Advanced Settings view, set Assertion Encryption to Encrypted and upload the certificate next to Encryption Certificate.Before:

10
Confirm sign-in works
Sign out of Oleria, go to https://www.oleria.com/sign-in, select the new provider, and confirm you land back in Oleria signed in.
Part 2: Set up SCIM
You can add SCIM provisioning to the same Okta app you just created for SSO - Okta supports provisioning on custom SAML apps once you turn it on, provided your org is licensed for it.Okta Lifecycle Management is required for SCIM
1
Enable provisioning on the Okta app

No Provisioning setting in the dialog? The most likely cause is that your org isn’t entitled to LCM, as described above. Two other causes: the app is an OIDC integration rather than SAML 2.0 or SWA (Okta doesn’t support SCIM on custom OIDC apps created in the Classic experience), or the app was created through the Okta API or Terraform rather than the Admin Console, which can leave the provisioning options absent or unconfigurable. If the app is a SAML 2.0 app created in the Admin Console and your org does have LCM, contact Okta Support to check whether the provisioning feature needs activating for your org.
2
Get Oleria's SCIM credentials
In Oleria, go to Settings → SCIM Configuration and select the same workspace you used in Part 1 (Main Workspace or Governance App). Copy the SCIM Base URL, Client ID, Client Secret, and OAuth Token URL.
3
Configure the API integration
On the Okta app’s Provisioning tab, select Integration, click Edit. Enter Oleria’s SCIM Base URL as the SCIM connector base URL, for unique identifier enter userName, and check Push New Users, Push Profile Updates, and Push Groups.
Set Authentication Mode to OAuth 2, under OAuth 2 set Grant Type to Client Credentials, and enter Oleria’s OAuth Token URL as the access token endpoint along with the Client ID and Client Secret you copied.
Oleria’s SCIM API only issues short-lived tokens through this client credentials exchange - it does not accept a single, static, long-lived bearer token. Use OAuth 2 / Client Credentials here, not the HTTP Header (bearer token) authentication mode. Okta mints and automatically refreshes its own token from the Client ID and Client Secret, so there’s nothing to manually re-enter later. See Authenticate to the SCIM API for how this same OAuth 2.0 Client Credentials flow works if you’re ever calling the API directly instead of through Okta.
4
Turn on the provisioning actions you need
Under Provisioning → To App, click Edit and enable Create Users, Update User Attributes, and Deactivate Users.
5
Main Workspace only: push groups from Okta
Main Workspace only: Oleria grants roles through group membership, not directly on the user (see How Oleria maps roles and groups).Governance App: there is no group-to-role mapping to configure - every provisioned user is assigned the single
reviewer role automatically. You only need users pushed, not groups.analyst role until you assign it a different one in the next step.6
Main Workspace only: assign each group a role in Oleria
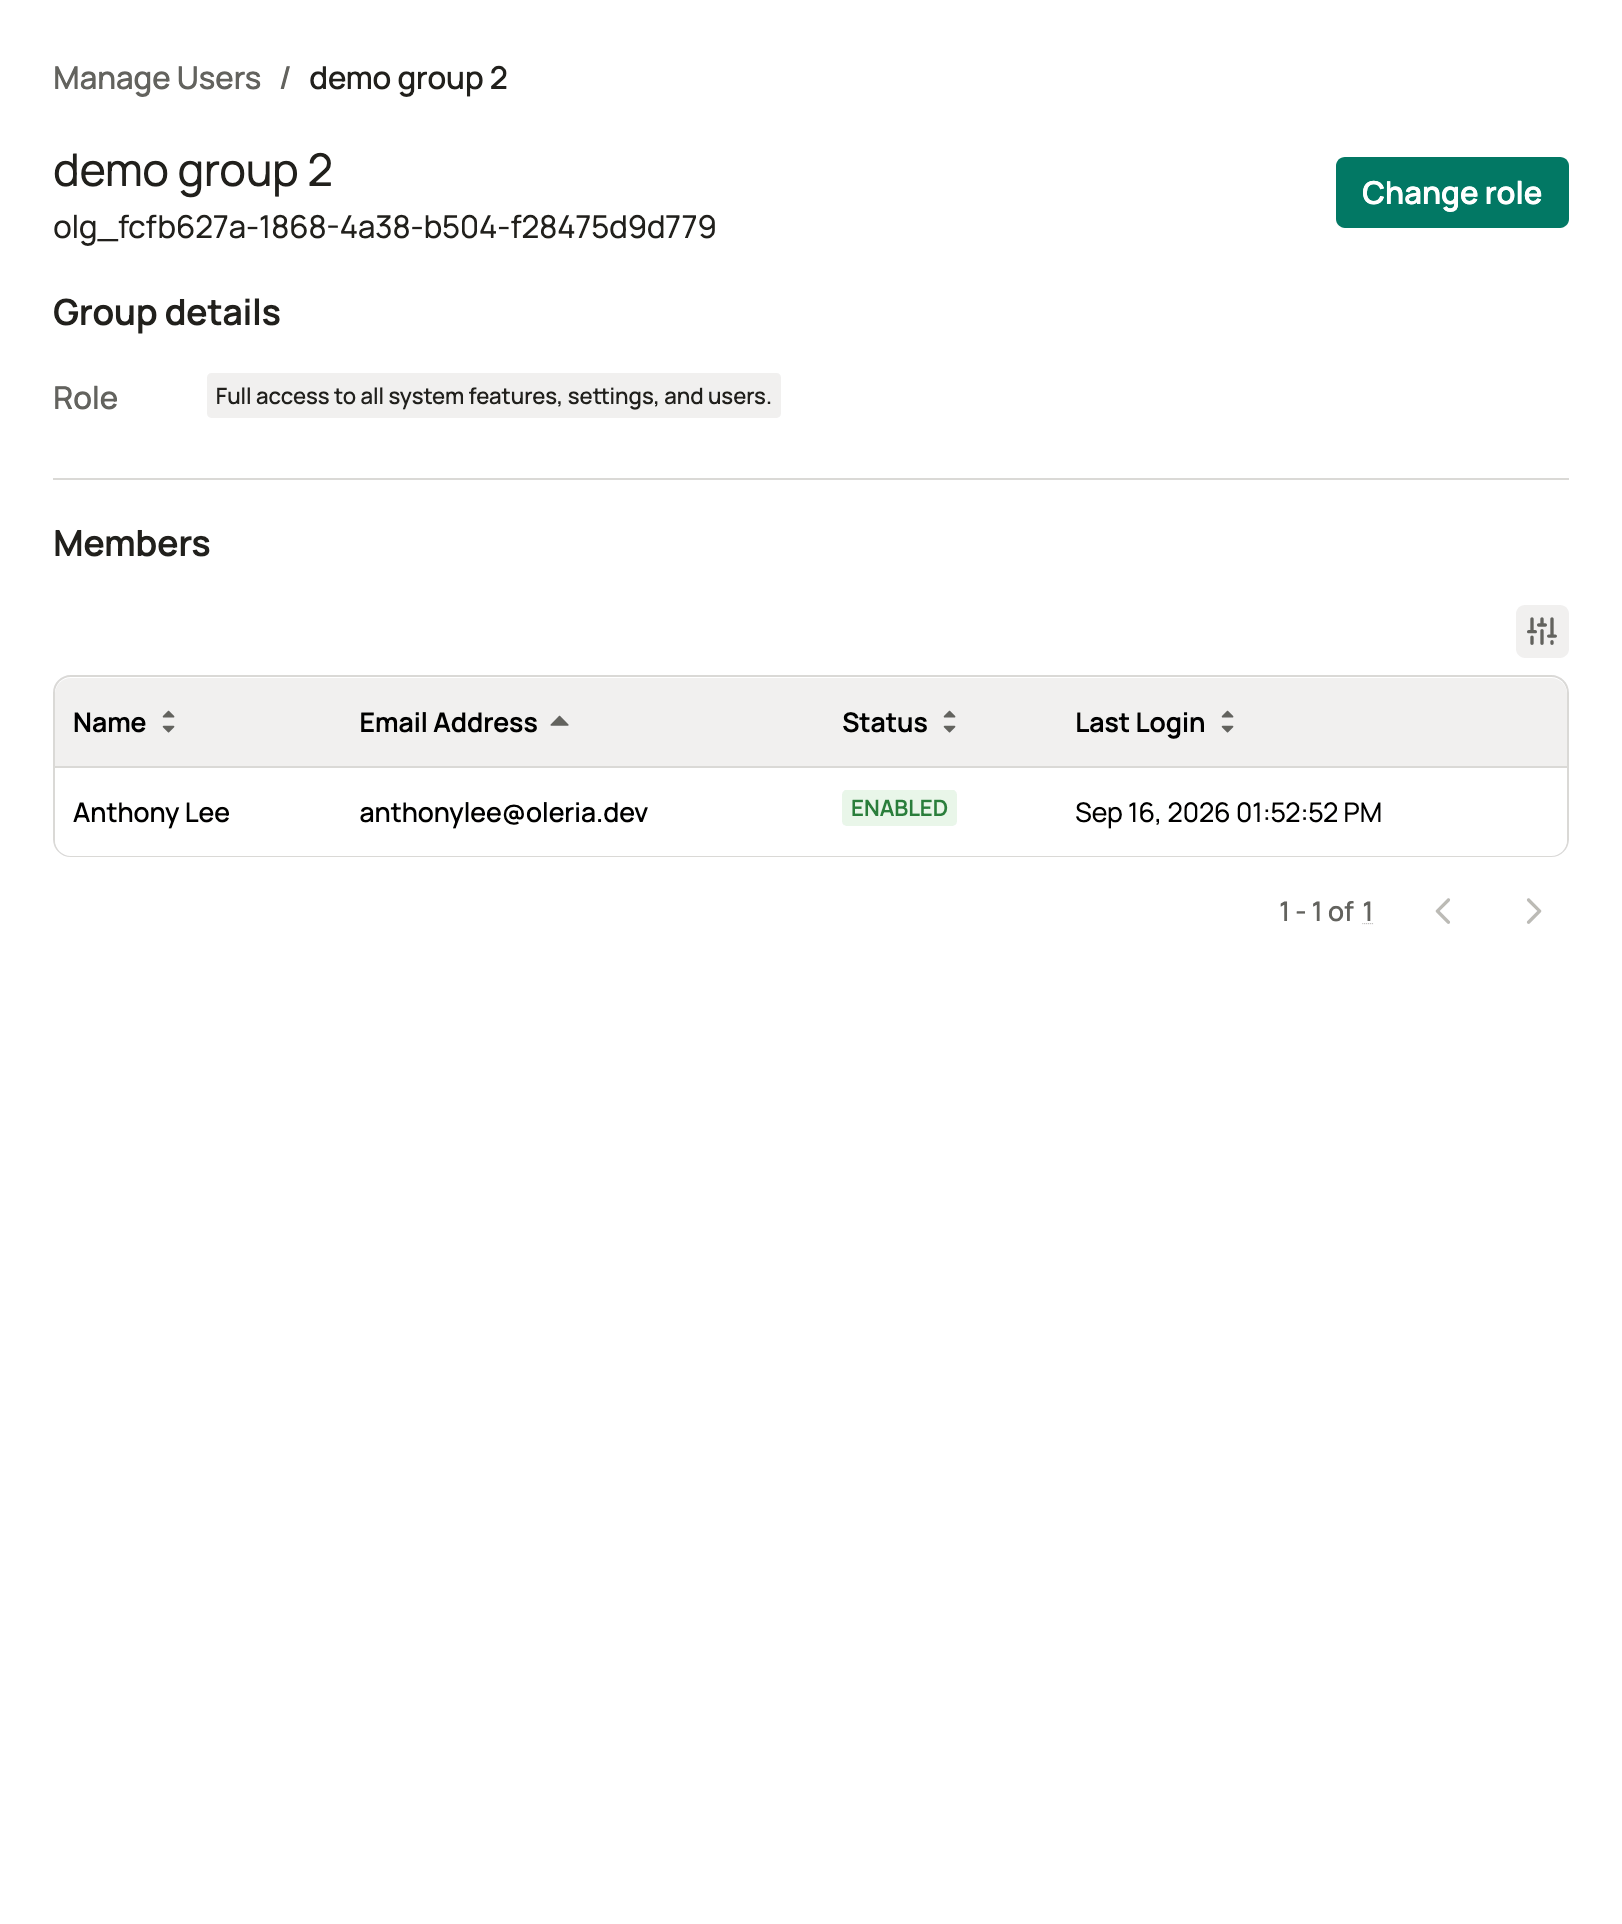
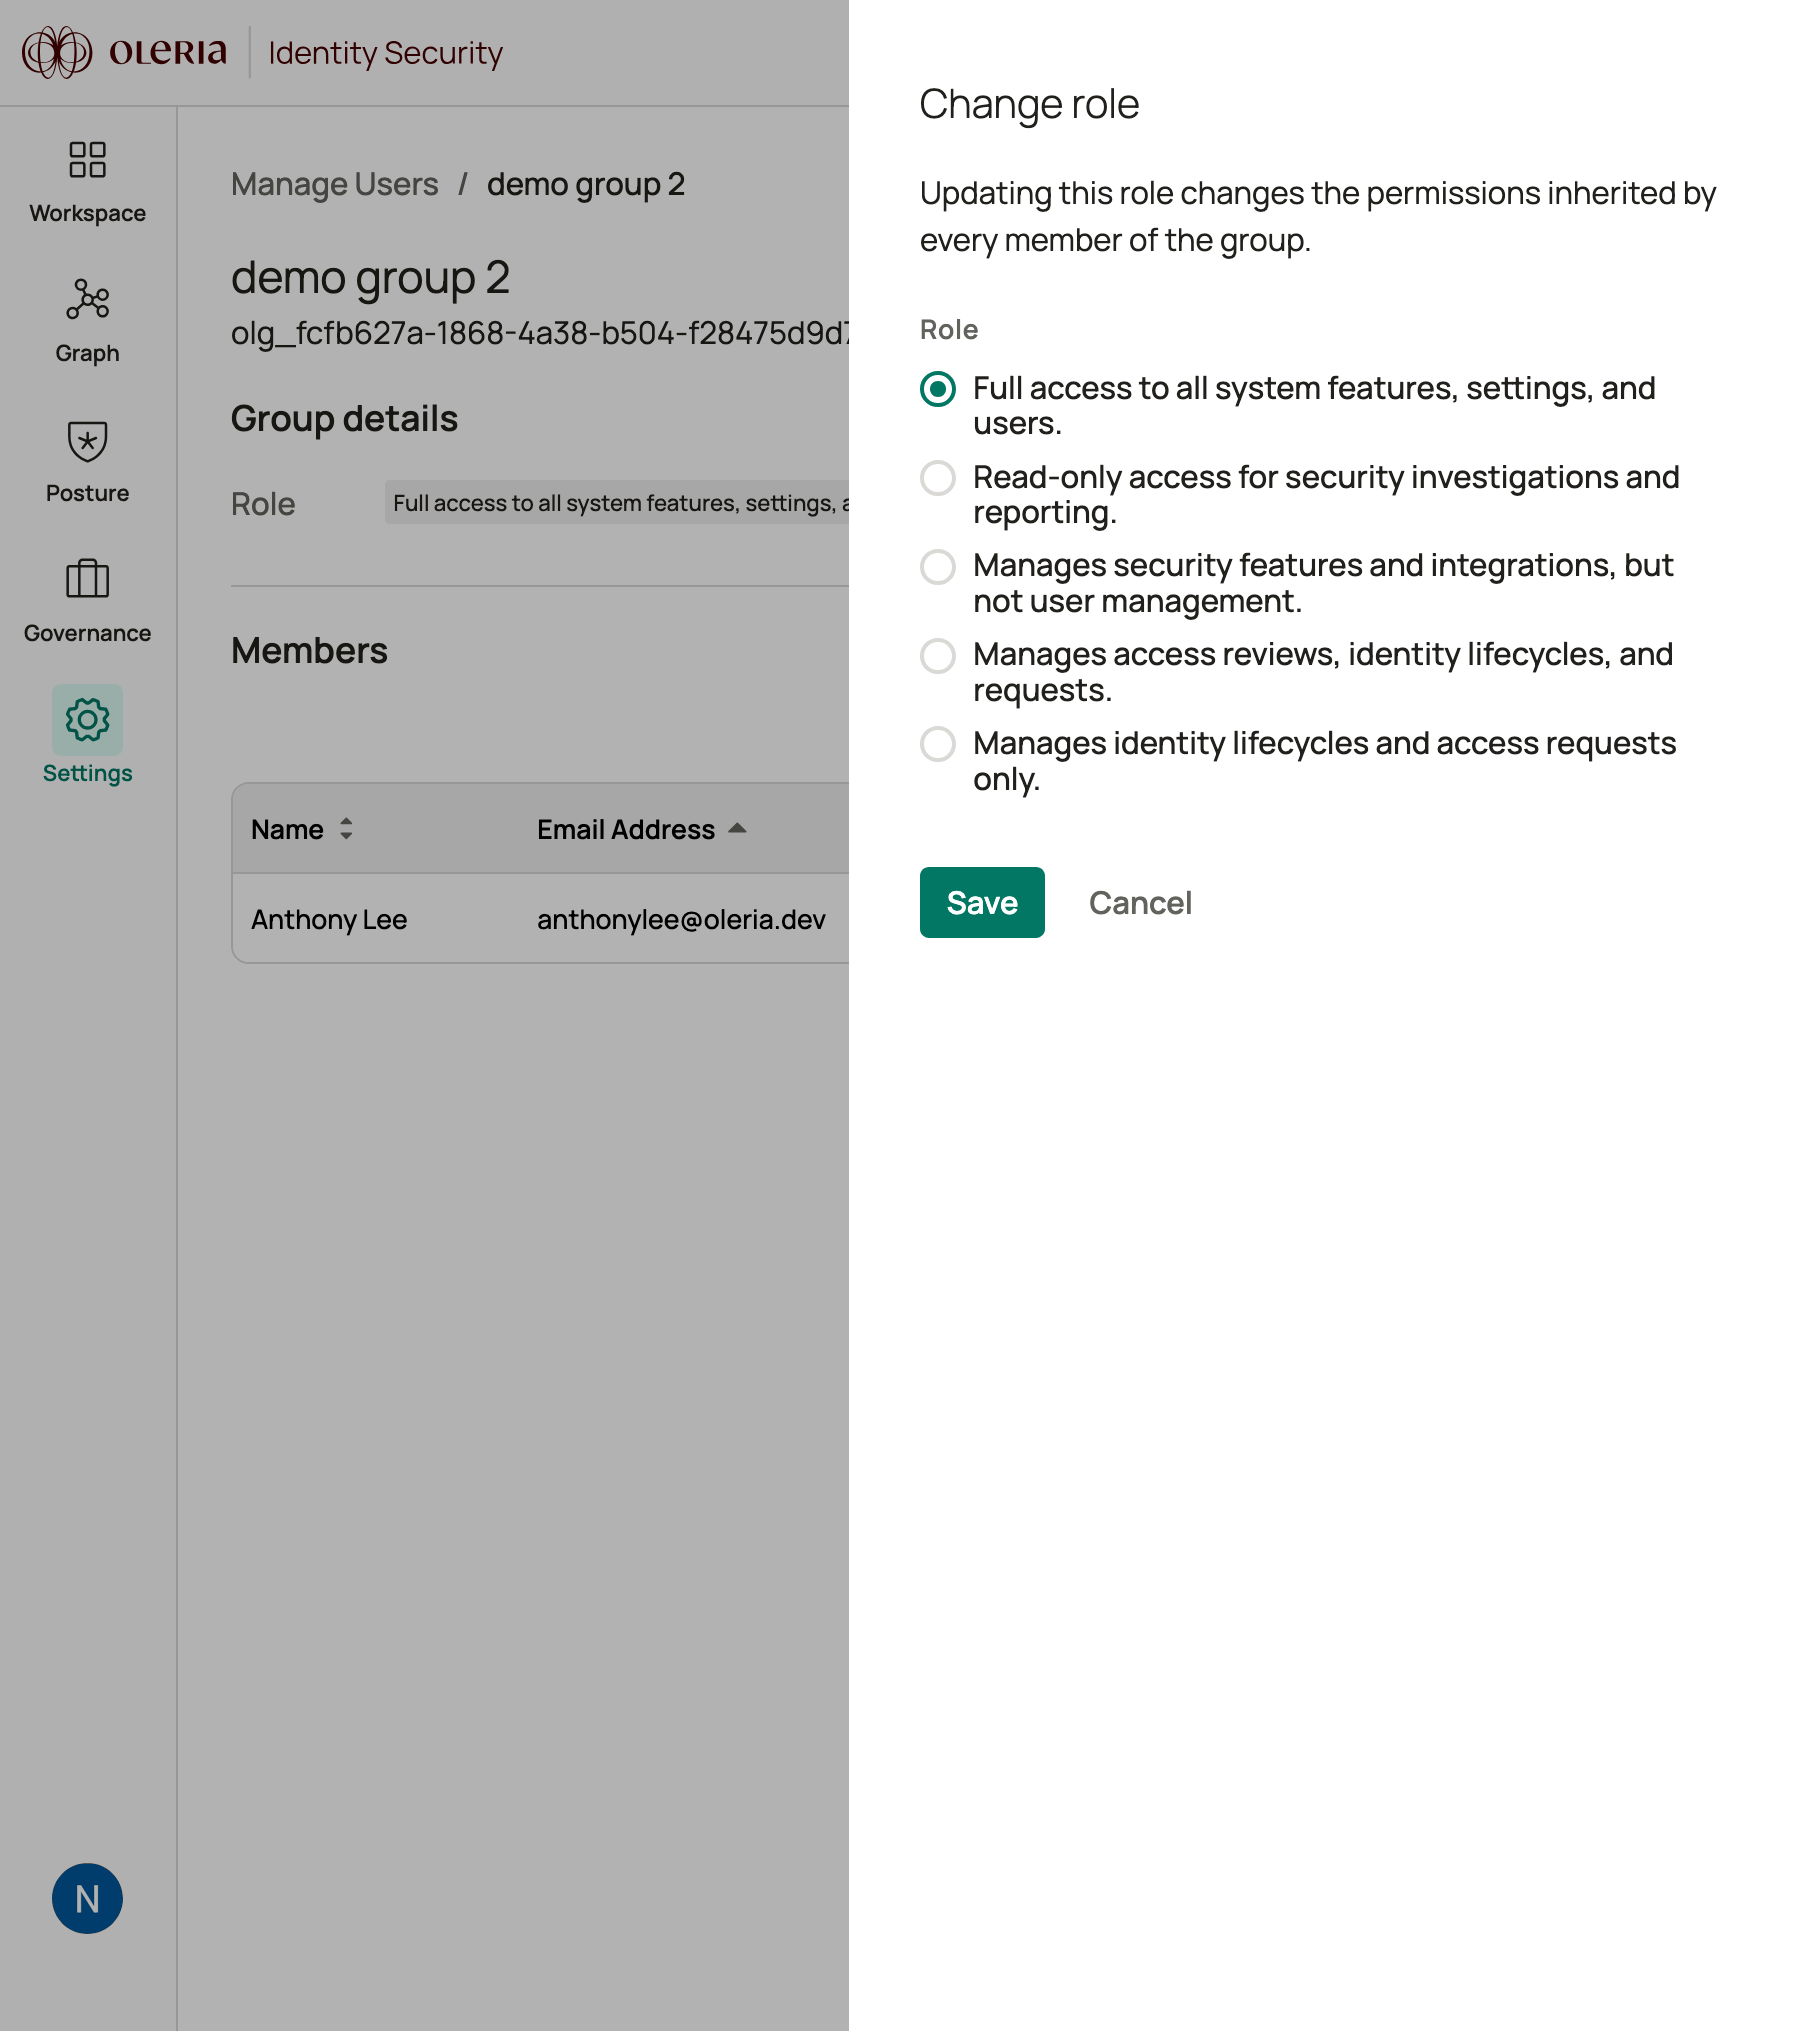
In Oleria, under Settings open Manage Users, select the Groups tab, and for each group you push, select it, click Change role, choose the role it should map to, and click Save. Every current and future member of the group inherits that role. See Assign a role to a group for the full walkthrough.Oleria’s Manage Users page: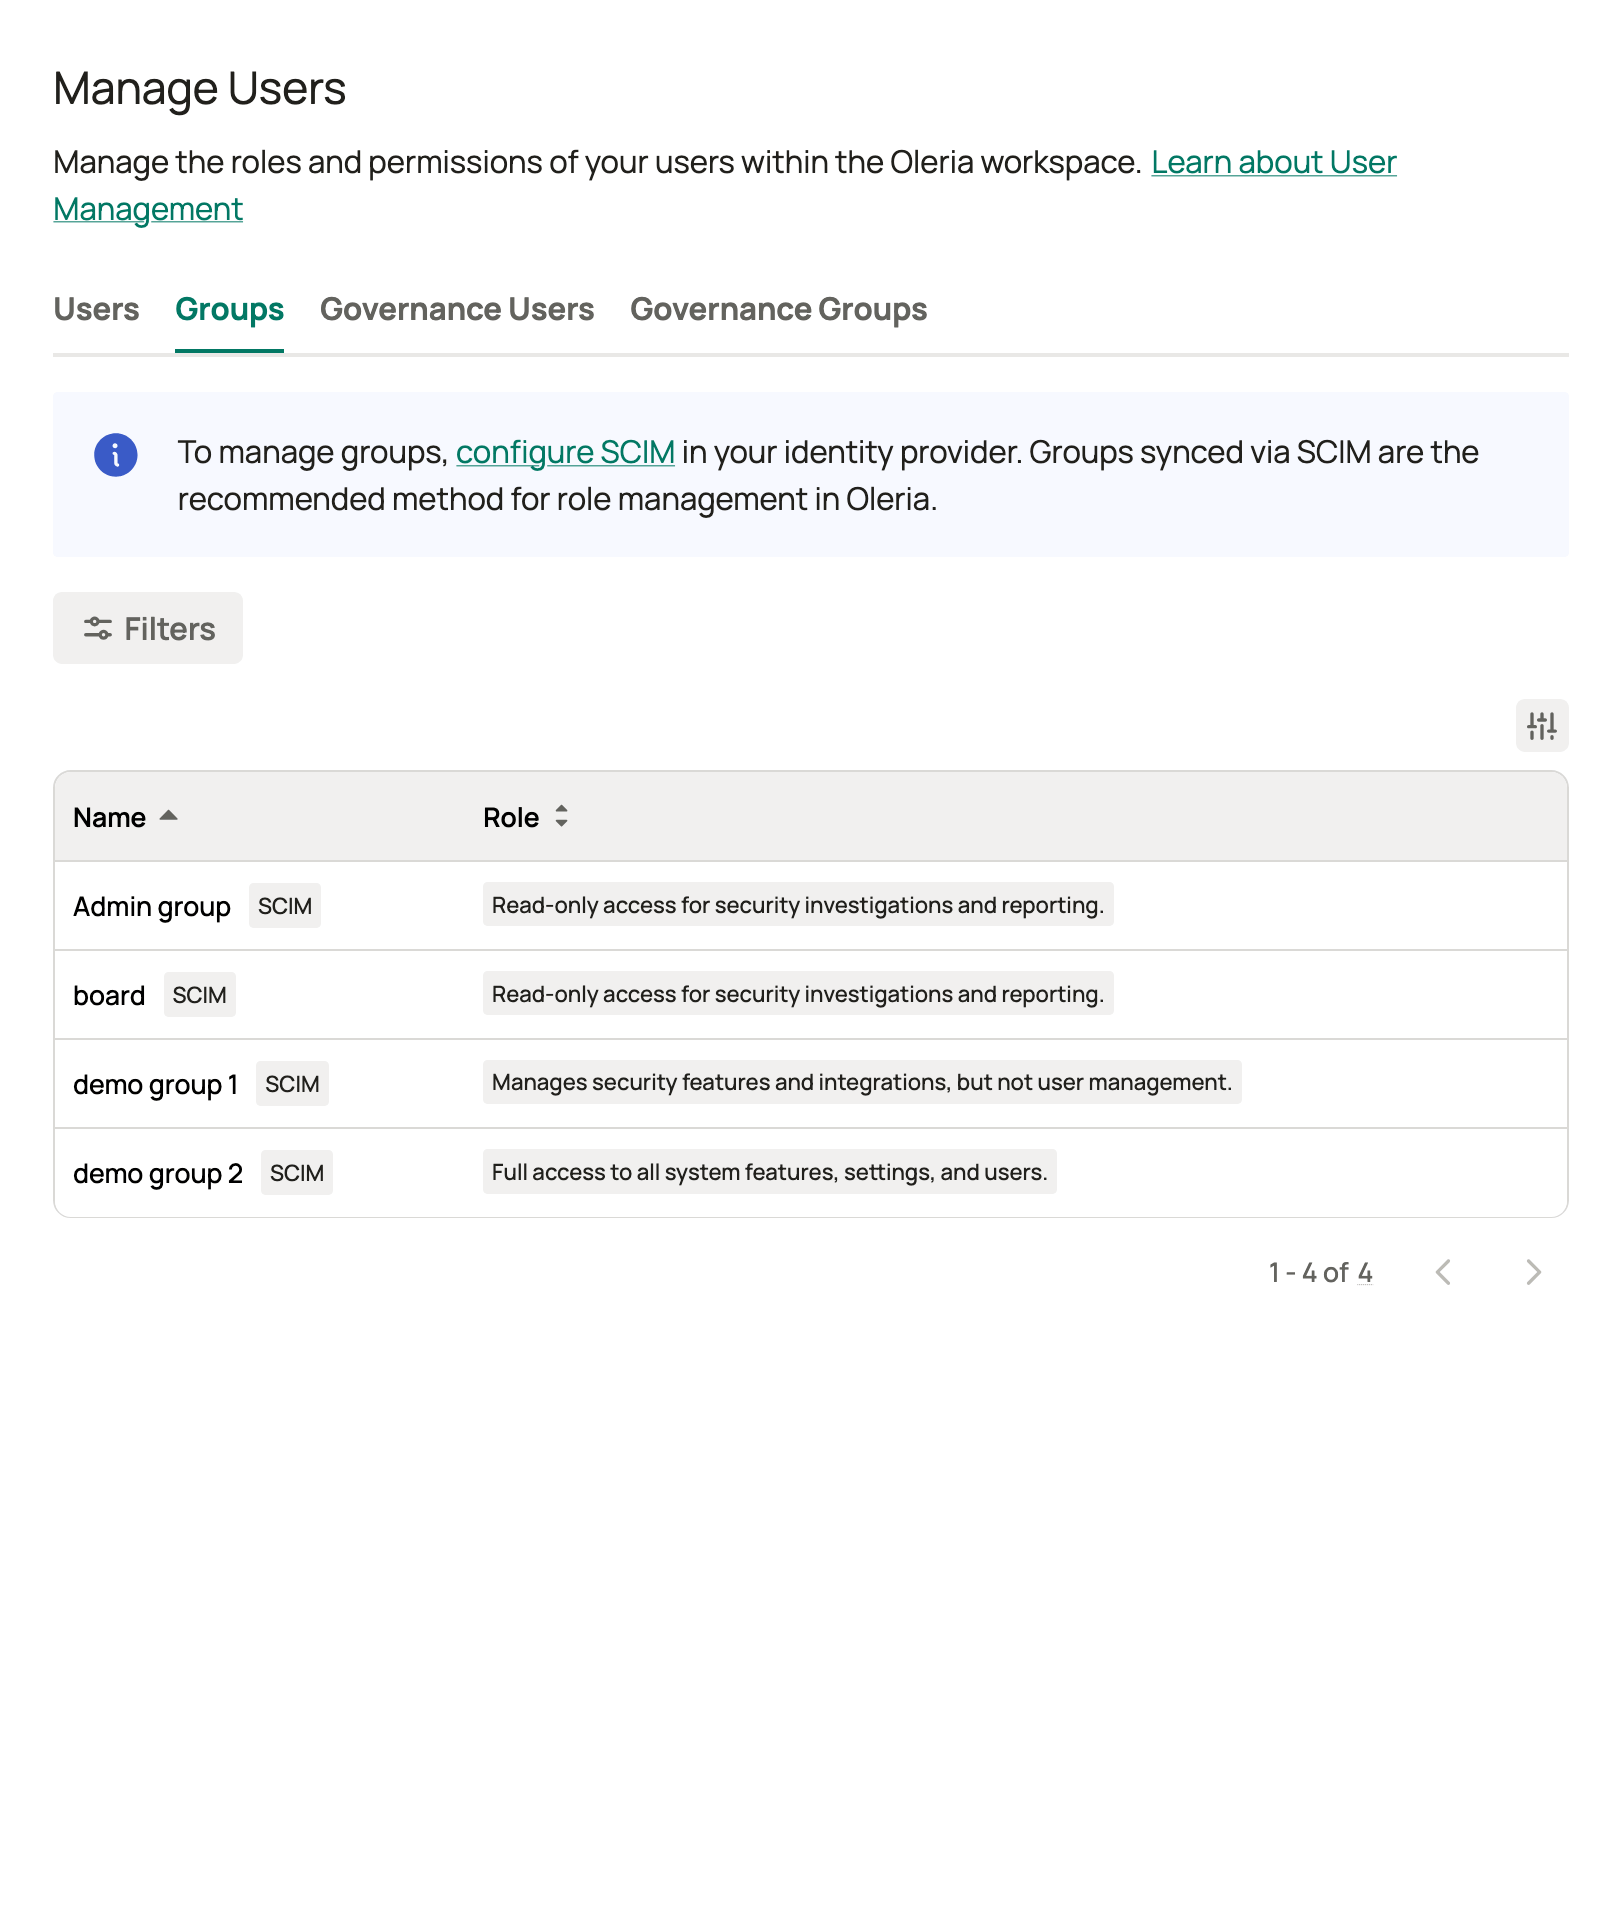
7
Assign and provision
Assign the users or groups who should get Oleria accounts to the app (Main Workspace: via the groups you just pushed; Governance App: directly, or via any group). Okta provisions matching users into Oleria within its usual sync interval.
8
Verify
In Oleria, confirm the new users appear (Main Workspace: in Manage Users with the expected role; Governance App: in the governance reviewer list). Deactivate or unassign a test user in Okta and confirm they lose access in Oleria.
Alternative for the Governance App: if you don’t need directory-driven deprovisioning and don’t want to build the Okta provisioning connector above, you can skip this Part entirely and use Oleria’s built-in automatic user provisioning instead - it only requires SSO (Part 1) to already be working. Follow Automatically provision reviewers to enable it and set allowed email domains. Remember this is not SCIM: it only creates accounts on sign-in and never deactivates them, so it’s not a substitute for SCIM if you need automatic offboarding.
Alternatives without Lifecycle Management
If your Okta org isn’t entitled to LCM and adding it isn’t an option, you can still get most of the way there. What’s available depends on which workspace you’re provisioning.There is no way to work around the LCM requirement from inside Okta. In particular, adding one of the generic SCIM 2.0 Test App integrations from the Okta Integration Network doesn’t help: LCM gates the Provisioning tab on catalog apps exactly as it does on custom apps, and those test apps authenticate with a static bearer token or basic auth rather than the OAuth 2.0 Client Credentials flow Oleria’s SCIM API expects. Okta Workflows is not a workaround either - it’s licensed as part of Lifecycle Management and Okta Identity Governance.
A common split is automatic user provisioning for the Governance App reviewer population plus hand-managed Main Workspace admins - that combination needs only SSO, and no LCM.
Set up the second workspace
Okta has no restriction on reusing the same Audience URI (SP Entity ID) or SCIM base URL pattern across multiple apps, so connecting the second workspace is simply repeating Part 1 and Part 2 with a second, separately-named Okta app pointed at the second workspace’s Oleria details and SCIM credentials. You do not need to reuse or share anything between the two Okta apps.Troubleshooting
- The Provisioning option is missing from the Okta app’s App Settings: see Okta Lifecycle Management is required for SCIM, and Alternatives without Lifecycle Management if you can’t add LCM
- Adding or editing the identity provider in Oleria: Troubleshoot identity provider errors
- Sign-in failures after the provider is saved: Troubleshoot sign-in failures
- SCIM request/response errors: the SCIM user provisioning and Governance App SCIM provisioning reference pages cover the request and response shape for every endpoint